
- 74
- 2 825 722
DaveRig Design
Canada
Приєднався 30 тра 2008
Building cool things in a informative way.
I'm a designer and fabricator at heart. In the past I've work in many mediums, Wood, Metal, fiberglass, ... and recently I've added 3D printing, CNC, and Lasers to my tool belt. Come follow along to see the what I build next.
I also have a Etsy store with some 3D print files but mostly svg files for lasers.If that's something you may be interested it check it out. daverigdesign.etsy.com
Use Professional Scanning Software for Your 3d Printing.
Reality Capture is professional photogrammetry software used by digital artist and VFX companies around the world and its now free for you to use at home. Follow along as I give a brief overview of the software and run though the process showing some tips and trick from my years of experience scanning items.
=============================
If you would like to support my work or get access to the files used in my video, head over to Patreon and take a look 🙏
=============================
▶️ www.patreon.com/DaveRigDesign
=============================
⚡ Visit my amazon store for a list of products I've used in builds
=============================
▶️ amzn.to/3vvFOP2
=============================
⚡ items specific to this build:
=============================
▶️ Reality Capture
➜ www.capturingreality.com/realitycapture-1-4
▶️ Nomad Sculpt for Ipad
➜ nomadsculpt.com/
▶️ Ender3 V3
➜ Creality Store: shrsl.com/4ia14
➜ Amazon.ca = amzn.to/4anAPzr
➜ Amazone.com = amzn.to/4cMzd3M
▶️ K1 Max:
➜ Creality Store: = shrsl.com/4iafi
➜ Amazon.ca = amzn.to/3wfDTPl
➜ Amazone.com = amzn.to/4aTnY8u
▶️ Bambu Lab P1P
➜ bambulab.com/en-ca/p1?product=p1p
=============================
📸Camera's gear:
=============================
▶️ Nikon D500
➜ Amazon.ca = amzn.to/3VwB1HB
➜ Amazone.com = amzn.to/3Xx3ChB
▶️ Sigma 17-50mm f/2.8
➜ Amazone.com = amzn.to/3XdFqQQ
▶️ DJI Action 3
➜ Amazon.ca = amzn.to/48Uz8Yz
➜ Amazone.com = amzn.to/3x3WePd
▶️ Gopro Hero9 Black:
➜ Amazon.ca = amzn.to/48IDkLP
➜ Amazon.com = amzn.to/48TeqsG
▶️ iPhone Pro Max 15
▶️ Samsung T7 external HHD
➜ Amazon.ca = amzn.to/4awe4ZZ
➜ Amazone.com = amzn.to/43yUAlb
▶️ Phone to HHD USB-C cable
➜ Amazon.ca = amzn.to/3TAmrhb
➜ Amazone.com = amzn.to/3IBqBz5
These are amazon affiliate links. As an Amazon Associate I earn a small commission from qualifying purchases. Using these links helps support this channel. Thank you!
=============================
📽Stock footage and graphics: motionarray.com/refer-to-friend/0a4653-gLZ7
=============================
🎵 Music by Epidemic sound: share.epidemicsound.com/kj1acc
=============================
=============================
If you would like to support my work or get access to the files used in my video, head over to Patreon and take a look 🙏
=============================
▶️ www.patreon.com/DaveRigDesign
=============================
⚡ Visit my amazon store for a list of products I've used in builds
=============================
▶️ amzn.to/3vvFOP2
=============================
⚡ items specific to this build:
=============================
▶️ Reality Capture
➜ www.capturingreality.com/realitycapture-1-4
▶️ Nomad Sculpt for Ipad
➜ nomadsculpt.com/
▶️ Ender3 V3
➜ Creality Store: shrsl.com/4ia14
➜ Amazon.ca = amzn.to/4anAPzr
➜ Amazone.com = amzn.to/4cMzd3M
▶️ K1 Max:
➜ Creality Store: = shrsl.com/4iafi
➜ Amazon.ca = amzn.to/3wfDTPl
➜ Amazone.com = amzn.to/4aTnY8u
▶️ Bambu Lab P1P
➜ bambulab.com/en-ca/p1?product=p1p
=============================
📸Camera's gear:
=============================
▶️ Nikon D500
➜ Amazon.ca = amzn.to/3VwB1HB
➜ Amazone.com = amzn.to/3Xx3ChB
▶️ Sigma 17-50mm f/2.8
➜ Amazone.com = amzn.to/3XdFqQQ
▶️ DJI Action 3
➜ Amazon.ca = amzn.to/48Uz8Yz
➜ Amazone.com = amzn.to/3x3WePd
▶️ Gopro Hero9 Black:
➜ Amazon.ca = amzn.to/48IDkLP
➜ Amazon.com = amzn.to/48TeqsG
▶️ iPhone Pro Max 15
▶️ Samsung T7 external HHD
➜ Amazon.ca = amzn.to/4awe4ZZ
➜ Amazone.com = amzn.to/43yUAlb
▶️ Phone to HHD USB-C cable
➜ Amazon.ca = amzn.to/3TAmrhb
➜ Amazone.com = amzn.to/3IBqBz5
These are amazon affiliate links. As an Amazon Associate I earn a small commission from qualifying purchases. Using these links helps support this channel. Thank you!
=============================
📽Stock footage and graphics: motionarray.com/refer-to-friend/0a4653-gLZ7
=============================
🎵 Music by Epidemic sound: share.epidemicsound.com/kj1acc
=============================
Переглядів: 21 321
Відео


Multi-Color 3D Printing with a Single Extruder.
Переглядів 664Місяць тому
Going through the printing process of creating Deadpool 3 inspired multicolor 3D printed LED lamp. Files of the print can be found here: makerworld.com/en/models/440524#profileId-346219 If you would like to support my work or get access to the files used in my video, head over to Patreon and take a look 🙏 ▶️ www.patreon.com/DaveRigDesign ⚡ Visit my amazon store for a list of products I've used ...

Simplest Way to Leveled your K1 Max Print Bed
Переглядів 4,5 тис.2 місяці тому
In this short video I'll show you the quick and easy fix I used to get things level and printing properly again. My K1 Max was great until I started printed across the whole bed, then found out there was some leveling issues that needed to be addressed. ⚡ Items use in video ▶️ K1 Max: ➜ Creality Store: = shrsl.com/4iafi ➜ Amazon.ca = amzn.to/3wfDTPl ➜ Amazone.com = amzn.to/4aTnY8u ▶️ Ender 3 V3...

Ender3 V3 Unboxing & First Impressions!
Переглядів 2,7 тис.2 місяці тому
Join me as I unbox the latest Ender3 V3 3D Printer! Watch as I set it up straight out of the box and run it through its first test prints. We'll explore its assembly, setup process, and see how it handles different print designs. Whether you're a 3D printing enthusiast or a curious beginner, this video will give you a comprehensive look at what the Ender 3 V3 has to offer. Don't miss the detail...

Creating a 3d Printed Dog Toy in TPU and testing its strength against a Husky
Переглядів 1,5 тис.3 місяці тому
Watch as I try 3D printing a dog toy using flexible materials! I'll go through the steps designing the toy and then printing it with TUP filament. Then we'll give the toy to my husky to play with and see how it hold up. If you want to print try printing this yourself you can get the file on my Patreon. Thanks to PCBWay for sponsoring this video! Get $5 of New User Free Credits using this link p...
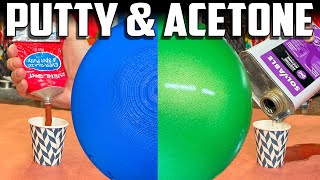
Hide 3D print layer lines with Acetone and Glazing Putty
Переглядів 14 тис.4 місяці тому
Fast and easy way to hide layer lines on your prints. The process involves thinning glazing putty with acetone to create a paste or thick paint and then applying it to your print. In the video I show how to use this to achieve a high gloss finish and a rough textured finish. Chapters: Intro: 0:00 Mixing: 1:30 Applying: 2:00 Sanding: 4:24 Priming: 5:47 Paint: 7:20 Final: 8:55 If you would like t...

NeoEco Airbrush - Big product, Small Price.
Переглядів 3,3 тис.4 місяці тому
In this airbrush review, I'll be taking a look at a inexpensive double action airbrush by Neoeco model number sj83. This gravity fed airbrush has many features for the price. I'll go over what comes in the box and test spray a few different paints to see how it performs. If you would like to support my work or get access to the files used in my video, head over to Patreon and take a look 🙏 ▶️ w...

Want to add Kerf Bending to your Laser Cutting Project? Watch this!
Переглядів 8414 місяці тому
I’m going to walk through my design process of creating curved walls by designing a pencil holder and laser cutting it using kerf cuts. We’ll start by designing the mesh in Fusion 360 and then move to Lightburn to layout the flat sections and create the kerf pattern on the curved body, then cut out the parts and assemble it. By the end you should understand the concepts to design your own produ...

Unbelievable Results: Testing PLA Shelf Brackets under Heavy Loads
Переглядів 5 тис.5 місяців тому
Testing how much weight 3D Printed PLA shelf bracket can hold. Using a custom testing rig I'll be testing and measuring 4 different shelf bracket designs printed in PLA to see how much weight they can hold and if it is practical to use. I've started a Patreon so if you would like to support my videos or get access to the files for the brackets used in the video go take a look www.patreon.com/Da...
How to Finish & Paint your 3D prints: Fill, Sand, Prime, Paint.
Переглядів 9 тис.5 місяців тому
Learn how to Post process a 3D printed helmet going through all the steps start to finish, glueing the pieces together, using UV resin and baby powder to coat the helmet, Sanding, Priming, and Painting to a Glossy finish. Also see how to print a transparent visor out of resin. So follow along and you should be able to create your own props in no time. Thanks to PCBWay for sponsoring this video!...
Printing and Post Processing a Clothing Mannequin on the Neptune 4 Max.
Переглядів 2,7 тис.7 місяців тому
Printing and Post Processing a Clothing Mannequin on the Neptune 4 Max.
Build a Huge Collapsible UV Resin Curing Box and Turntable for Cheap
Переглядів 7 тис.8 місяців тому
Build a Huge Collapsible UV Resin Curing Box and Turntable for Cheap
What hides 3D Print Layer Lines Better, Resin or Resin with Baby Powder
Переглядів 230 тис.9 місяців тому
What hides 3D Print Layer Lines Better, Resin or Resin with Baby Powder
Hide 3D print layer lines with Baby Powder and UV resin
Переглядів 1,2 млн9 місяців тому
Hide 3D print layer lines with Baby Powder and UV resin
How to scan your dog to 3D print a helmet.
Переглядів 4,3 тис.Рік тому
How to scan your dog to 3D print a helmet.
3D Printing a Huge Lego Space Man LED Lamp
Переглядів 2,6 тис.Рік тому
3D Printing a Huge Lego Space Man LED Lamp
How to hide layer lines on 3d prints.
Переглядів 519 тис.2 роки тому
How to hide layer lines on 3d prints.
How I made my Outdoor Cement Counter Top
Переглядів 4972 роки тому
How I made my Outdoor Cement Counter Top
Making a Outdoor Concrete Gas Fire Table
Переглядів 23 тис.3 роки тому
Making a Outdoor Concrete Gas Fire Table
Optical Tachometer build for LongMill CNC
Переглядів 1,6 тис.4 роки тому
Optical Tachometer build for LongMill CNC
3D Printing a Super Sized Lego Space Man Part 3
Переглядів 18 тис.4 роки тому
3D Printing a Super Sized Lego Space Man Part 3
Tevo Tornado Spool Holder Strength Test
Переглядів 6354 роки тому
Tevo Tornado Spool Holder Strength Test
where i will find this 3d model?
I need help with this
thank you oh knowledgeable one
lol, no problem. Glad you like it🙏
The background music on this video is kind of annoying.
I noticed some "gaps" in those eyes. Would the fuzzy skin effect would "mask" that poor filling? Or any other tips...
Don’t think fuzzy skin would do anything. Just need the 1st layer dialed in so lays down the proper line thickness. There weren’t any gaps in the print, on issue on the white is there was some stringing on the black layer I didn’t catch that got embedded in the white.
@@DaveRigDesign Sorry my words. English is not my first language. ;o) But I am glad you could understand what I meant. Thanks for your feedback.
Very nice video, brilliant idea. Kind of stands to reason that the powdered resin has a much lower viscosity, eh?
Thanks 🙏 Ya it’s kind of house paint these days is 1 coat and is almost as thick as glue :)
have you thought of using a starch such as corn starch or potato starch?
Probably would work also.
Dude, a final sanding with water and a very fine grain and polishing with car body compound and omg
I think it looks uncanny with the face insert. And I mean that in a good way.
Ya, from some angles it looked ok, but other were weird due to the visor warping effect.
@@DaveRigDesign I feel like the visor came out looking really good! I think it's pretty much impossible to get it looking absolutely perfect. I love Metroid and I just got into 3D printing. Been struggling a lot. Been trying to print with ABS.
@LelandHasGames ABS it tough unless you have an enclosed printer. I would stick to pla if your just starting out until you get the hand of thing, it’s way easier to work with.
@@DaveRigDesign I had some success with ASA and I've had lots of success with PLA. Most of my filament is ABS though. :/
great music!
Thanks :)
I wish their was something for super clear I need clear spheres. 30cm 14cm and 4cm spheres. I wish someone would help me with 3d printing.
If you need solid clear spheres you would need to use silicon molds and 2 part epoxy.
I have 4 of these brushes and they all work great.
Yep started watching as very interested, but stopped it half way through as the music covered everything, especially his voice. Sad.
Way too much work…I rather just sand the layer line off…you end up doing it already.
And take way longer and much more effort
Love this dude, i just wonder how this would hold up with my rottweilers playing tug with it
Playing tug should be fine. I doubt the tpu will break. It only failed when my husky chewed on it the cut it.
Really Cool 😎Well done!
Thanks 🙏
@@DaveRigDesign Hi, there. Noob question, here. Why that rectangle shape was made at 03:32? To clean up the nozzle? Thanks.
At first I was printing with a print tower which is where the printer prints a little inner square before going to the print. It’s to make sure there is not colour bleeding when changing.
@@DaveRigDesign Oh, nice. Thanks.
Do you have any advice as far as when I print a multicolor print where I don't need to paint what filler could I use that's clear
If you didn’t want to paint but still have a smooth surface I would try clear resin, either 2 part or UV. Just need one that doesn’t yellow and stays clear. Then you can apply multiple layers sanding between to build up a clear candy coating. I have a few videos on my channel showing the process, I paint after but it’s the same idea.
Good job
Amazing video! very detailed!
Thanks, glad you liked it 🙏
Hello how to make a bed mesh and on which application, créality print is it possible?
Yeah I have no idea where to find that hope you get the answer
@min0rmeme108 the mesh can be seen in the fluid interface. I think you can get to it from the Creality slicer or at lease you can get the up address of your machine and they type that into a web browser and get to it that way. But your machine needs to be hooked up to your home network to access it
@@DaveRigDesign I had to root the k1 max to be able to see it
@DaveRigDesign thanks for the reply I'm actively trying to figure this thing out just started 3d printing like 4 days ago started well enough and hit the fan yesterday
@min0rmeme108 that should be needed. You should be able to see it without rooting
I'm late to this party, but if you have a thin recess detail (particularly if you don't need fill in it at all) an easy way to mask it out is using a brushable silicone paint mask with a small tip brush. Fill in the recess, then do whatever you need over the surface, and peel it out before paint and clear coat.
I am having issues with curing when using baby powder. My prints do not seem to 100% cure, even if left in the chamber for hours. Does the consistency or ratio of powder to resin cause curing issues?
I wouldn’t think so. Unless you use alot of powder. When I cured my resin there would still be an oily film left which it why I would wipe them down with IPA before sanding. Is that what you are seeing? Other than the residue the resin would fully cure.
Looks great man, I used the same method on some Mandalorian armor I made for my son for Halloween. You can sand PLA straight, but the resin feels like it sands so much easier and smoother. For big stuff like that you can cure it in the sun as well.
Thanks. Sanding resin is so much easier then sanding pla :)
Thank you for sharing this whole process! I learned a lot
Thanks and You’re welcome. 😀
Scan. Epic stuff thanks! I want to scan my car as 3d models online are over $100 and not 3d print ready. Would you suggest the same technique with the baby powder? Cloudy day for even lighting? Big concrete space? Do you need to circle or could your path be an oval? Thanks
Thanks. That would be a lot of baby powder, but would work :) or drive down a dust road for a while. You don’t need to make perfect circles around the car just going around in bands so ovals are fine.
@@DaveRigDesign haha thanks. I have a gravel driveway so ill spend some time hooning around on that. A drone would work best? Keeping an equal distance away?
You could use a drone but you can cover most just with a camera. Maybe a step ladder to get up higher to get the roof
Exactly what I need to do on my 3D print. Thanks for the presentation.
Have anyone tried 0.04 layer height to get amazing result
this guy over here dehydrated af with that hanging cuticle
Have you ever thought of using a "lazy susan" type of mechanism to help you with the rotation of the object? There are a few cool 3d printed projects that people have shared online to help with photogrammetry. Also, do you recommend Nomad Sculpt? Does a higher resolution camera result in a more detailed model?
I used to use a lazy Susan when I had a more permanent setup, it’s defiantly easier if you scan a lot of things In really like nomad sculpt. Using the iPad pencil makes things a lot easier. But blender would also be fine. Zbrush is the industry standard software for sculpting but it’s pricy and has a steep learning curve due to its UI :) Any decent camera will work fine. Higher res images will give more detail but come with higher processing times and camera price. You can also just take more/closer images to get the same effect.
@@DaveRigDesign Thanks! I will take a look at Nomad Sculpt.
Scan! I'm very grateful for this video, I was using a the free 3DF Zephyr up til now, and I haven't done too much 3D scanning yet but it didn't seem to be the best program, and it was slightly weird to use. I use 3D scanning for cosplay purposes and I'm not involved in the 3D scanning community and don't keep up with news on it so this video was very very informative. Just in time too, because I'm about to try 3D scanning myself with the help of a friend, because I have a complicated cosplay planned that needs a lot of 3D printing. So I'm looking forward to trying out this program.
Awesome. Getting a clean scan of a person with 1 camera is difficult as even small movements will create noise and misalignments. Make sure you have something to hold onto like 2 chairs or something while being scanned to help stay still.
They fixed up the UA-cam 3d modelling tutorial Now it looks just like a nightclub Everyone’s excited and confused
Scan 👍🏼 very interesting
I wonder if resin powdered side is like a Newtonian fluid ad that is why it is more even
I think it’s more even just due to being thicker and being more material to level out. Just resin goes on thinner so there is less material to flatten out.
You need to place the object on rotating base. That will evenly distribute the resin using centrifugal force
Gravity is still a thing :) Adding a rotating base will pull it all down to the bottom as it’s the largest circumference
@@DaveRigDesign the problem isn't gravity it is the lateral forces not spreading out the solution causing spotting. Rotational motion will provide the lateral force and gravity the downward giving an even thickness. They use this in chip fabrication.
That is very very interesting
So matte spray paint everything before scanning.
Only smooth, uniform colour, shiny things
Isnt it that you can take a picture now and let ai convert it
Nope, not yet. Ai can create general idea of the object and the mesh is not great.
Scan. That was a ton of cleanup needed though. I’d love to see ai in this space taking care of the tedious hundreds of steps though.
The cleanup was due to not prepping the tape measure properly. The controller only needed to have the base removed. After taking the pics there are 4 steps, it’s pretty manageable. Where AI can help is working with the texture to get even lighting and shadow removal. That in the most difficult part which I didn’t show cuz it’s not needed for printing.
Thank you for making this video. I completely forgot about the Epic announcement and I’ve been looking for scanning software. I was considering polycam otherwise
Would a soft box help with the lighting?
Somewhat. The black square next to the camera you can see in some of the video is a soft box. Since textures aren’t used lighting is less important. Normally you want flat even light to avoid shadows being baked into the texture. But that’s isn’t a concern so as long as it’s well lit with no dark shadows it should be fine
Wonderful video, thank you! Is that the new Ender3v3 coreXY machine near the end of the video?
Thanks! Yes it is. The tape measure is printed on the ender3 v3, the controller mount printed on a Bambi p1p and the show on a K1 Max
Scan! Soo awesome! Thanks for sharing. Can’t wait to try this out
Thanks, 👍🏻
Scan. Thanks for this great tutorial.
Thanks, glad you liked it 🙏
Scan… I would like to see a more detailed explanation on how to import the 3-D scan into Fusion 360 and use it as a reference. Specifically, I want to scan a multimeter that I own and create a protective cover for it.
In fusion it’s just a matter on importing the mesh. You’ll want to bring down the poly count a lot 1st or fusion will choke. You can do this in RC or a modeling program. Usually the scans come in at an odd orientation and the scale needs to be adjusted to match the real asset. This also can de done in either program.
12:12, do you see the face on the xbox controller :D
You found my Easter egg. It took so long to paint that in the pounder…. lol Jk
Scan My interest is scanning a human head to make a bobble-head in the likeness of the person. Any suggestions?
Living things are tricky because of the object being scanned deforms in shape at all it causes alignment issues and noise, and it’s almost impossible for a human to hold an expression long enough. Normally to do this you build a rig of multiple cameras that all fire at the same time to avoid this issue. It is possible to get someone to sit still while you quickly take the pictures but it’s difficult. Possibly you could create a generic head mesh and then just scan the persons face and merge it onto the mesh. Saves scanning the whole head.
not worth the time consumed and hassles
Took me maybe 1hr from scanning to mesh ready to print including waiting for processing. If you need to model a complex mesh that is a 100% copy of a really life object there is no faster way.
What about scale? You didn't showed what method you use to make the actual size of the object which is the whole point of this process. RC offers measurement tools but there are also other ways.
You can scale in RC or on your editing software after. You just need to know a measurement between 2 points on the mesh and then uniformly scale the mesh until those points match the real world item measurements.
I randomly stepped on the video and... WHAT? Reality Capture is now for free?? I had used it in the past but with just my phone i didn't had the best results and didn't wanted invest a lot of money into experimenting with it. I knew about the better priceing model since Epic bought it in hope that they will make it for free, but that pricing model was still costy. And now i missed it's free?? Jesus i can't believe it. I think it's the best Photogrammetry software on the market since it is the fastes but also the easiest to use (Without looking at those smartphone apps)
Scan! Awesome video, thank you!
Thanks 🙏